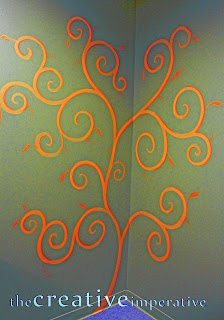
I recently did some work in the Community Cupboard at our church; this ministry provides food to those who need it in our area. The woman who runs the Cupboard, Donna, works tirelessly in this ministry! I wanted to do something that would spruce up her work area a bit...
Take a look at the brushes below... which do you think I used to do the majority of the work?
If you said the big one, you're right! I guess the title of this post might have helped you a little, but you still get full credit.
If you learn how to correctly hold and manipulate a 2 1/2 inch angle sash brush, it will cut your painting time in half! Not to mention, your lines will be much cleaner. My favorite brands of these brushes are the Sherwin Williams contractor series (nylon/polyester)
and Corona (can be difficult to find and a little expensive, but if you see one grab it!). Sometimes Benjamin Moore stores carry them.
Since you'll be paying a little bit more for your brush, you're going to want to take good care of it. Always wash it thoroughly when you're done painting! If you get some crusties on the side of the brush (I usually do if I'm painting for a few hours at a time), you can use a wire brush to help you clean/scrape the sides of the brush. These are super cheap and a great thing to have around
Next time you paint, try holding your brush like this
This is how I would hold it to paint a vertical line. The brush does all the work for you when it comes to keeping your lines straight. It is up to you to adjust how much pressure you put on the brush, which will determine the width of your brushstroke.
It will take a little getting used to, but practice on an old board or right on your wall (you can always paint over it).
Here is what the line looked like with the 1" angled sash brush (which is still bigger than an artist's brush)
Can you see how it is all streaky and uneven? The bigger brush allowed me to do all of the work in one coat and still keep my lines crisp.
Of course, I couldn't use the 2 1/2" brush for everything... the turns on some of the scrolls were too tight for the big brush. Here is where I switched to the little brush.
*I know I've talked about this before, but remember to use white chalk to draw your design out! It erases later with a wet rag*
Now you just finish out the design with the smaller artist's brush
You'll probably need two coats on these parts... but it's better than having to two coat the entire thing!
I added some orange accents in, just to make it stand out a little more. The colors I used in this space were all pretty similar in tone and I wanted to give it a little more pop
Then I added a few leaves and tendrils, just because it needed something else
I also painted the Community Cupboard's mission statement on the wall... again, use the biggest brush you can get away with to keep your lines straight!
I played with the opacity of the paint in the words "love" and "Christ" by mixing some of the background color with the orange color. Overlapping some of your words helps add visual interest too!
One more trick: use your fingers! Do you see the colon after the word "mission"? I dipped my finger in the paint and it gives you a nearly perfect circle! This works great for dotting your "i"s and periods too.
Who needs vinyl, right? I just printed the words out onto paper and traced the outlines onto the wall. I'm sure that vinyl would have given me crisper lines, but it just isn't in the budget right now.
Have any questions? Ask in the comments and I'll do my best to answer! If you are a "noreply" blogger, please be sure to leave your email address.
Thanks for stopping by!
Blessings,
Jamie
Pin It
This post is featured here


