Showing posts with label Christmas decor. Show all posts

Monday, December 03, 2012

Make a Christmas Pillow from an Old Sweater

I knew I was holding on to this old sweater for a reason... I made it into this!


I used the sleeves last winter for this wreath

See the resemblence?


I was starting to think I was nuts for holding onto that cut up sweater... turns out my craft-hoarding paid off!

I was originally inspired by these

They don't have these pillows anymore (and I wouldn't pay that much for them anyway) so I dug out the old sweater remnant!

This is what it looked like when I pulled it out of my scrap bin.

I cut off all the area above that is shaded gray.

Then I sewed it (inside out) into a square, leaving about 6 inches to stuff the pillow form in.  I stuffed it and sewed up the rest of the seam.


And now for the bow...

I made a long chain by casting 4 sts onto a size 11 knitting needle and knitting a stockinette stitch until it was long enough to wrap around the pillow and tie a bow.

The berries were crocheted from a pattern I found at Petals to Picots.  I made 5 of them and stitched them onto the pillow.  Easy peasy!

Thanks for stopping by!
Blessings,
Jamie

This post is linked here:  Today's Creative Blog Blue Cricket Design Kurtz Corner Mommy by Day Crafter by Night Cherished Bliss Lines Across My Face Southern Lovely Bear Rabbit Bear French Country Cottage Craft Junkie Too DIY Home Sweet Home Saved by Love Domestically Speaking Funky Junk Interiors Homemaker on a Dime Eisy Morgan The Answer is Chocolate Making the World Cuter Craft-O-Maniac lolly jane 504 Main I Heart Naptime Singing Three Little Birds mad in crafts House of Hepworths Somewhat Simple Chic on a Shoestring Keeping it Simple Be Different Act Normal Sew Can Do Sew Chatty Pinkapotamus The Girl Creative Flamingo Toes Tatertots and Jello Sisters of the Wild West Reasons to Skip the Housework Giggles Glitz and Glam Tip JunkieThe Trendy Treehouse Ladybug Blessings Night Owl Crafting Tea Rose Home My Girlish Whims Allie Makes Gluesticks Thrifty 101 Momnivores Dilemma A Little Knick Knack Miss Mustard Seed Freckled Laundry kojo designs A vision to remember Primitive and Proper 733 Rook no 17 Home Stories A to Z Naptime Crafters Whipperberry delightful order blissful and domestic elizabeth and co diy by design gingersnap crafts>my repurposed life

featured here


My Uncommon Slice of Suburbia

Thursday, December 15, 2011

Christmas House Tour!

I thought I'd share a few more pics from the house before Christmas; plus the Nester is having a Christmas home tour link party so I couldn't pass that up.  Let's start with the tree!
I still want to change a few things but it will probably have to wait till next year.

I'm still just smitten with the striped ruffle skirt

And I love my "new" gold birds


I added these dollar store styrofoam ornaments to my branches this year... I had originally planned on doing something to them, but I'm really liking the white
up close
And here is the ledge between the kitchen and the living room
We have a bell on the ledge that I will 'ding' and say "order up!" when I put food there for the kids.  Now my son says, "order up in the snow!" since I have the fake snow there.
We can't forget about the marshmallow tree
Or the dry erase Oh Holy Night lamp


Looking at these pics, I can't believe how white/neutral our Christmas decor has become since last year.  The mantel in the basement has a lot of white too
Here's a detail from the Glory to the newborn King sign

Here's the yarn and jingle bell wreath on the front door


Thanks so much for stopping by!
Blessings,
Jamie

Thursday, December 08, 2011

Golden Birds

Once I changed out our Christmas tree skirt, everything else on the tree looked jacked up.  Little by little I'm trying to change a few things...
These birds just got upgraded.

They used to look like this

so I sprayed them with gold spray paint

Much better, right?

That is, unless you are a St. Louis Cardinals fan.  I originally bought all the birds as a nod to my dear husband's favorite team.  Sorry babe, the red birds just weren't cutting it anymore!  I did leave a few red just because the kids love cardinals.

Thanks for stopping by!  Let me know what you think of my "new" blinged-out birds!
Blessings,
Jamie
Pin It

This post is linked here:  Today's Creative Blog Blue Cricket Design Kurtz Corner Mommy by Day Crafter by Night Cherished Bliss Lines Across My Face Southern Lovely Bear Rabbit Bear French Country Cottage Craft Junkie Too DIY Home Sweet Home Saved by Love Domestically Speaking Funky Junk Interiors Homemaker on a Dime Eisy Morgan The Answer is Chocolate Making the World Cuter Craft-O-Maniac lolly jane 504 Main I Heart Naptime Singing Three Little Birds mad in crafts House of Hepworths Somewhat Simple Chic on a Shoestring Keeping it Simple Be Different Act Normal Sew Can Do Sew Chatty Pinkapotamus The Girl Creative Flamingo Toes Tatertots and Jello Sisters of the Wild West Reasons to Skip the Housework Giggles Glitz and Glam Tip JunkieThe Trendy Treehouse Ladybug Blessings Night Owl Crafting Tea Rose Home My Girlish Whims Allie Makes Gluesticks Thrifty 101 Momnivores Dilemma A Little Knick Knack Miss Mustard Seed Freckled Laundry kojo designs A vision to remember Primitive and Proper 733 Rook no 17 Home Stories A to Z
Naptime Crafters Whipperberry delightful order
The DIY Club

Monday, December 05, 2011

A Painted Sign for Christmas

I wanted a sign for our mantel this Christmas (and was looking for an excuse to pull the Silhouette back out)

It is actually the backside of this sign

I painted base coat of gray and then dry brushed a little white on top

Cut the vinyl stencil with the Silhouette and laid it on top

I painted the bold letters with a color called "cinnamon"... I really wanted to make sure the color didn't end up looking pink

and I painted the script letters in black

This is what I ended up with!

Here it is with the entire mantel... it isn't quite finished yet for Christmas, but I like the sign as an addition this year

Thanks for stopping by!
Blessings,
Jamie
Pin It


This post is featured here: 
DomesticallySpeaking

This post is linked here:
Today's Creative Blog Blue Cricket Design Kurtz Corner Mommy by Day Crafter by Night Cherished Bliss Lines Across My Face Southern Lovely Bear Rabbit Bear French Country Cottage Craft Junkie Too DIY Home Sweet Home Saved by Love Domestically Speaking Funky Junk Interiors Homemaker on a Dime Eisy Morgan The Answer is Chocolate Making the World Cuter Craft-O-Maniac lolly jane 504 Main I Heart Naptime Singing Three Little Birds mad in crafts House of Hepworths Somewhat Simple Chic on a Shoestring Keeping it Simple Be Different Act Normal Sew Can Do Sew Chatty Pinkapotamus The Girl Creative Flamingo Toes Tatertots and Jello Sisters of the Wild West Reasons to Skip the Housework Giggles Glitz and Glam Tip JunkieThe Trendy Treehouse Ladybug Blessings Night Owl Crafting Tea Rose Home My Girlish Whims Allie Makes Gluesticks Thrifty 101 Momnivores Dilemma A Little Knick Knack Miss Mustard Seed Freckled Laundry kojo designs A vision to remember Primitive and Proper 733 Rook no 17 Home Stories A to Z
Naptime Crafters Whipperberry delightful order
The DIY Club

Sunday, December 04, 2011

Stripey Ruffle Christmas Tree Skirt

I have absolutely fallen in love with all the ruffle tree skirts out there.  I wanted one for myself but I really really really don't have time to make one right now.  No really, I don't have time.  I made one anyway!

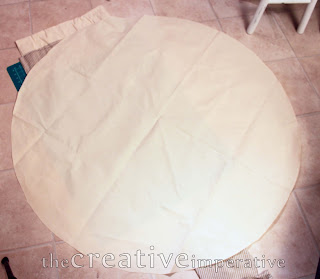
I started with some heavy duty canvas that I had.  Let's be honest, the stuff is almost 10 years old and I haven't stretched my own canvas in years.  It's time to put this stuff to good use.

I folded it

Marked it with my teacher style big fat blackboard compass

And cut it with my rotary fabric cutter

I seriously can't believe what a nice circle I ended up getting doing it this way!  Are you admiring my circle as much as I did?  It's OK if you don't get as excited about circles as I do.  It's about 50 inches in diameter; I snipped a cut that was 25 inches from one end straight to the center so I had a way to get it around the tree.

Then I went all Fraulein Maria on some old curtains

I cut them into 8" strips

And hemmed them.  I know there are all those beautiful shabby chic ruffle skirts with their raw edges out there, but I couldn't help myself.  I wanted it hemmed

Then I started bunching and hot gluing the ruffles to the circle
Here's the outermost layer of ruffles.

It really didn't take that long to do (about two hours) and I used less than 2 window panels.  I ended up with 5 tiers of ruffles.

And here it is under the tree

Now I want to redo my entire tree... more on that later this week.
Blessings,
Jamie
Pin It

This post is featured here:   Keeping It Simple


Mushki Loves My Stuff" />


This post is linked here:  Today's Creative Blog Blue Cricket Design Kurtz Corner Mommy by Day Crafter by Night Cherished Bliss Lines Across My Face Southern Lovely Bear Rabbit Bear French Country Cottage Craft Junkie Too DIY Home Sweet Home Saved by Love Domestically Speaking Funky Junk Interiors Homemaker on a Dime Eisy Morgan The Answer is Chocolate Making the World Cuter Craft-O-Maniac lolly jane 504 Main I Heart Naptime Singing Three Little Birds mad in crafts House of Hepworths Somewhat Simple Chic on a Shoestring Keeping it Simple Be Different Act Normal Sew Can Do Sew Chatty Pinkapotamus The Girl Creative Flamingo Toes Tatertots and Jello Sisters of the Wild West Reasons to Skip the Housework Giggles Glitz and Glam Tip JunkieThe Trendy Treehouse Ladybug Blessings Night Owl Crafting Tea Rose Home My Girlish Whims Allie Makes Gluesticks Thrifty 101 Momnivores Dilemma A Little Knick Knack Miss Mustard Seed Freckled Laundry kojo designs A vision to remember Primitive and Proper 733 Rook no 17 Home Stories A to Z
Naptime Crafters Whipperberry delightful order
The DIY Club
Related Posts Plugin for WordPress, Blogger...